
Many groups have presented already and some are still going tomorrow or Thursday. To be honest I am disappointed with the number of groups who have not been ready on time and say things like "I didn't know we had to do such and such.". EVERYTHING has been put on the blog - it is your primary information and guidance source. Yes, videos should have been put on Youtube, spreadsheets simulated during the presentation, mail merge letters shown after merging, links to spreadsheets published, etc.
Anyways, there are some great resources that you have worked hard on. Well done to those of you who have put your best effort in.
ONE final request - please give me constructive feedback, suggestions, and ideas about the Project. I have learnt a lot and would like to learn more through listening to what you have to say. Click here to Feedback.
Here are the results of your feedback:
The end is coming - Feedback PLEASE
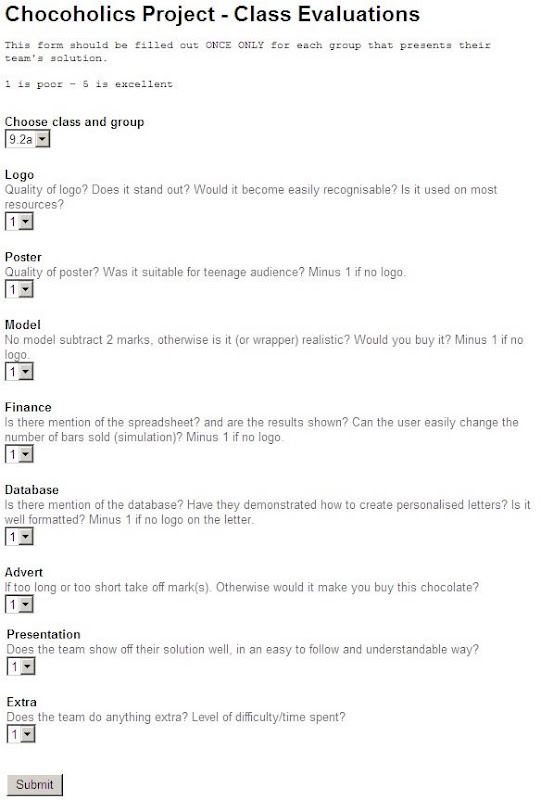
Give your score for each Presentation
Remember that you are only allowed to fill out the form ONCE for each Presentation and not for your own group's presentation. It records your username and time filled out, so be careful please.
Google Presentations (they are NOT PowerPoints)
Remember your Presentation can contain links to your other Google Docs. BUT the link URL to the document has to come from using the PUBLISH tab. Otherwise the document will not be able to be viewed unless it has also been individually shared.

Presenting to the class
Before presentations begin, someone from each team needs to collaborate their Presentation with me (click Share > Invite Collaborators and put my Gmail address: "gravesdmr").
Your teacher will be logged on at the front of the room so that the Presentation can be run through their account and therefore have access to each team's Youtube video advert.
Remember your video is an Advert - so it should be about 15 - 30 seconds long!!
Team logos


Lesson 8 - How the winners will be decided
Everyone in the class is going to vote anonymously using the voting form below. So, bear this in mind when doing your Presentation and preparing it for presenting to the class.
Making logos have transparent backgrounds
Many students have asked about this.
It is definitely possible with a little bit experimenting (and persistence). Perhaps the best way is to open the image file in Fireworks, click the Magic Wand tool, click the background (hold shift to do it all) then press delete on the keyboard. Save it as a Portable Network Graphic (.png) before putting into another program. Here is an example using my profile photo:![]()
Or you can try the Picture tool in Office:
Lesson 7 - Deadline approaching

Don't forget your JOURNAL entries - it is your proof of your contributions! And that you have been doing homework each week.
Feedback to Google Docs
Now that you have been using Google Docs for a little bit, perhaps you have found some things difficult or other things you are used to in Office being unavailable?
I found this page where you can give feedback and vote for new features on Google Docs. Feel free to fill it out and submit it.
Lesson 6 - Collaborate on your hard work
Remember that once you have worked on something for your team, the spreadsheet, logo, or advert, etc make sure that the rest of your team can see it (or edit it) and give you feedback to improve it. Remember this is a team effort and a team solution!
Don't forget your JOURNAL entry with screen hunt.
REMEMBER - each time you do HOMEWORK (30 mins), evidence of what you have done should be recorded in your JOURNAL as proof!
Prizes for the winning teams
The winning teams of each class need a solution that is fully complete (i.e. satisfies everything in the original presentation in Lesson 1) and a group presentation that "sells" the product and solution the best to rest of the Chocoholics Company.
Click here to see how this slideshow was put above.
Lesson 5 - New chocolate bars are cooking
Video advert - remember we do have video cameras for use - just ask the teacher. Once you have filmed, you connect the USB cable and download the video to your computer. This video can then be imported into MovieMaker. The cameras take still photos as well.
Logo + Poster, etc - A note about IMAGES - If you use Paint Shop Pro for example, its native format is .psp, so when you come to use the image, you need to save it as a Portable Network Graphic (png). This will preserve transparency.
Mailmerge in Google Spreadsheets - well as close as one can get at the moment to doing mailmerge. Here is an explanation:
- In your database spreadsheet, add an empty column A, then fill with numbers 1, 2, 3, ...
- Add a new sheet called "Letter".
- In cell A1, type a "1".
- In cell A2, use the formula =concatenate() which puts together the text that will make up your letter. The letter will be in one cell only because presently Google spreadsheets cannot print without gridlines. Inside the concatenate, vlookup needs to be used to look up parts of each address and name of customer or supplier, also char(10) needs to be used to go on to the next line.
- Do a Print to see how the letter looks (it opens in Acrobat Reader).
- When the letter is complete and working as desired (as you change the number in A1 the the address and name should change), print preview for final time, then click on the sheet tab and Duplicate your letter as many times as you need letters.
- Rename each sheet appropriately, then change the number in A1 for each letter as well as hide each row 1. Then all sheets could be printed in one go (please do not as it will waste paper).
- Here (sign in to use or copy it) is a basic working example which looks like:
Journal - remember to make an entry and use screen hunts to show what you have done.
Guidelines for this Project - All students to read
It has come to my attention that some students are forgetting school rules.
Remember that just because we are doing this project online and in groups doesn't mean that school rules such as bullying should be ignored. Bad language is another example. Google Docs provides features whereby it is easy to see who is writing what (and when). Let me demonstrate with a screen shot:
Revisions show who makes changes, when, and what exactly is changed. (Useful in the real world.)
This is a last warning - I don't want to see or hear any further violations of school rules. Offenders will be forwarded to Mr Manning.
Lesson 4 - mmm chocolate!

It would be good to change the time zone for your Google Docs, so you can see when things are modified. Click on Settings when you are in Google Docs, then select GMT +8 Singapore.
Otherwise, I think things are going well.
See the results below (a refresh will be needed and it might take a few minutes):
I have put in this survey for 2 reasons:
1. To see how students are finding this project
2. To demonstrate how a survey can be inserted into a blog or web page to collect data (with results shown almost automatically on a graph)
If you are interested in doing the survey thing, then open a new or exisiting spreasheet, click on the Share tab, click on the 'to fill out a form' button, then click the 'Start editing your form...' button:

There are different types of questions available for the form (see below).
There is no way at the moment to prevent people from submitting the form more than once.
Experiment a little to see how it works (keep a watch on your spreadsheet to see how the data comes in to it from the form).

For more help - do a search in the Google Docs Help.
Remember to make a journal entry! (see under Lesson 1)
Lesson 3 - do your task (s)
Some good progress made last lesson. Some group leaders still need to rename their planning spreadsheet properly and share it with me. See me or email me if you're not sure what I mean.
More Notes/Tips:
Logo: Here is an online drawing tool to try (certainly for initial drawings/sketches of your logo) - http://www.kerpoof.com/create Try out the tool for a minute or two and try out sharing it to your team (you will need to Register) to see how it works and what can be done with it. You will all need to use the same username and password and edit it one at a time. I cannot find a good multi-user online drawing tool - perhaps you can?!
Poster: The above online drawing tool could also be used for initial designs or even final poster. Otherwise use a Google document or Microsoft Publisher. Either way you will need a way to "collaborate" your poster with your team. Remember the poster will have to use your logo and go into your final presentation.
Video advert: Videos that you find online could be used in your video advert (credit should be given at the end to avoid copyright infringement). There are web resources that allow you to save an online video to your computer:

Remember that once you have completed your video in MovieMaker you have to save the actual new video file. (Just saving in MovieMaker saves a 'project' file which has details of titles, cuts, effects, with links to the movies and images used.)
Save it for Best quality for playback on my computer. If the quality is poor, then try a better quality setting.
Upload it to a video sharing website such as YouTube or GoogleVideo - then your presentation can include your video advert!


